记录MySQL开发中遇到的填坑经历。
1.局域网访问报错 message from server: “Host ‘xxx’ is not allowed to connect to this MySQL server
可能是你的帐号不允许从远程登陆,只能在localhost。这个时候只要在localhost的那台电脑,登入mysql后,更改 “mysql” 数据库里的 “user” 表里的 “host” 项,从”localhost”改称”%”
1 2 3 4 5 6 7 8 9 10 11 12 13 14 15 16 17 18 19 20 21 22 23 24 25 26 27 28 29 30 31 32 33 34 35 36 37 38 39 40 41 42 43 D:\Programs \mysql -8.0.23-winx64 \bin >mysql -u root -p Enter password : *******Welcome to the MySQL monitor . Commands end with ; or \g .Your MySQL connection id is 33Server version : 8.0.23 MySQL Community Server - GPL Copyright (c ) 2000, 2021, Oracle and /or its affiliates .Oracle is a registered trademark of Oracle Corporation and /or its affiliates . Other names may be trademarks of their respective owners .Type 'help ;' or '\h ' for help . Type '\c ' to clear the current input statement .mysql > use mysql ;Database changed mysql > select host , user from user ;+-----------+------------------+ | host | user | +-----------+------------------+ | localhost | mysql.infoschema | | localhost | mysql.session | | localhost | mysql.sys | | localhost | root | +-----------+------------------+ 4 rows in set (0.00 sec ) mysql > update user set host = '%' where user = 'root ';Query OK , 1 row affected (0.00 sec )Rows matched : 1 Changed : 1 Warnings : 0mysql > select host , user from user ;+-----------+------------------+ | host | user | +-----------+------------------+ | % | root | | localhost | mysql.infoschema | | localhost | mysql.session | | localhost | mysql.sys | +-----------+------------------+ 4 rows in set (0.00 sec ) mysql >
例如,你想myuser使用mypassword从任何主机连接到mysql服务器的话。
1
2
3
GRANT ALL PRIVILEGES ON *.* TO 'myuser'@'%' IDENTIFIED BY 'mypassword' WITH GRANT OPTION; FLUSH PRIVILEGES;
如果你想允许用户myuser从ip为192.168.1.6的主机连接到mysql服务器,并使用mypassword作为密码
1
2
3
GRANT ALL PRIVILEGES ON *.* TO 'myuser'@'192 .168 .1 .3 ' IDENTIFIED BY 'mypassword' WITH GRANT OPTION; www.2 cto.com FLUSH PRIVILEGES;
如果你想允许用户myuser从ip为192.168.1.6的主机连接到mysql服务器的dk数据库,并使用mypassword作为密码
1
2
3
GRANT ALL PRIVILEGES ON dk.* TO 'myuser'@'192 .168 .1 .3 ' IDENTIFIED BY 'mypassword' WITH GRANT OPTION; FLUSH PRIVILEGES;
在安装mysql的机器上运行:
d:\mysql\bin\>mysql -h localhost -u root这样应该可以进入MySQL服务器mysql>GRANT ALL PRIVILEGES ON *.* TO 'root'@'%' WITH GRANT OPTION 赋予任何主机访问数据的权限 mysql>FLUSH PRIVILEGES修改生效 mysql>EXIT 退出MySQL服务器
这样就可以在其它任何的主机上以root身份登录啦!
2. 链接MySQL提示“Too many connections” 字面意思就是连接数过多,超限了。那么现在就查下当前限制多少连接数,并且修改最大连接数。
1
2
3
4
5
6
7
8
9
10
11
12
13
14
15
16
17
18
19
20
21
22
23
24
25
26
27
28
29
30
31
32
33
34
35
36
37
38
39
40
41
42
43
44
45
46
47
48
49
50
51
52
53
Microsoft Windows [版本 10 .0 .19043 .1348 ] (c) Microsoft Corporation。保留所有权利。 D:\Programs \mysql -8.0.23-winx64 >cd bin D :\Programs \mysql -8.0.23-winx64 \bin >mysql -u root -p # 使用root 用户登录mysql Enter password : *******Welcome to the MySQL monitor . Commands end with ; or \g .Your MySQL connection id is 8Server version : 8.0.23 MySQL Community Server - GPL Copyright (c ) 2000, 2021, Oracle and /or its affiliates .Oracle is a registered trademark of Oracle Corporation and /or its affiliates . Other names may be trademarks of their respective owners .Type 'help ;' or '\h ' for help . Type '\c ' to clear the current input statement .mysql > show processlist ; # 查询mysql 的所有连接+----+-----------------+-----------------+------+---------+------+------------------------+------------------+ | Id | User | Host | db | Command | Time | State | Info | +----+-----------------+-----------------+------+---------+------+------------------------+------------------+ | 5 | event_scheduler | localhost | NULL | Daemon | 4304 | Waiting on empty queue | NULL | | 8 | root | localhost :55747 | NULL | Query | 0 | init | show processlist | +----+-----------------+-----------------+------+---------+------+------------------------+------------------+ 2 rows in set (0.00 sec ) mysql > show variables like '%max_connections %'; # 查询最大连接数,看到只有 20+------------------------+-------+ | Variable_name | Value | +------------------------+-------+ | max_connections | 20 | | mysqlx_max_connections | 100 | +------------------------+-------+ 2 rows in set , 1 warning (0.01 sec ) mysql > set GLOBAL max_connections =1000; # 设置最大连接数 1000Query OK , 0 rows affected (0.00 sec )mysql > show variables like '%max_connections %'; # 再次查询最大连接数,看到已经是设置好的 1000 了+------------------------+-------+ | Variable_name | Value | +------------------------+-------+ | max_connections | 1000 | | mysqlx_max_connections | 100 | +------------------------+-------+ 2 rows in set , 1 warning (0.00 sec ) mysql > exit # 退出mysql 命令行Bye D :\Programs \mysql -8.0.23-winx64 \bin >
超过连接数的原因,是mysql的连接数保持时间太长。可以修改一下保活机制show global variables like 'wait_timeout' ,就是最大睡眠时间。
修改一下set global wait_timeout=300; 自动杀死线程。
1
2
3
4
5
6
7
8
9
10
11
12
13
14
15
16
17
18
19
20
mysql> show global variables like 'wait_timeout'; +---------------+-------+ | Variable_name | Value | +---------------+-------+ | wait_timeout | 28800 | +---------------+-------+ 1 row in set, 1 warning (0.01 sec) mysql> set global wait_timeout=300; Query OK, 0 rows affected (0.00 sec) mysql> show global variables like 'wait_timeout'; +---------------+-------+ | Variable_name | Value | +---------------+-------+ | wait_timeout | 300 | +---------------+-------+ 1 row in set, 1 warning (0.00 sec) mysql>
刚刚的配置是临时修改,重启mysql会失效。可以通过修改mysql的配置/etc/my.cnf。
1
2
3
4
5
6
max_connections = 1024 group_concat_max_len = 1024 # 最大睡眠时间 wait_timeout=300 # 超时时间设置 interactive_timeout = 500
修改完毕后,重启mysql即可。
因为连接mysql8版本的数据库需要新的驱动。
1 2 spring.datasource.driver-class-name=com.mysql.cj.jdbc.Driver
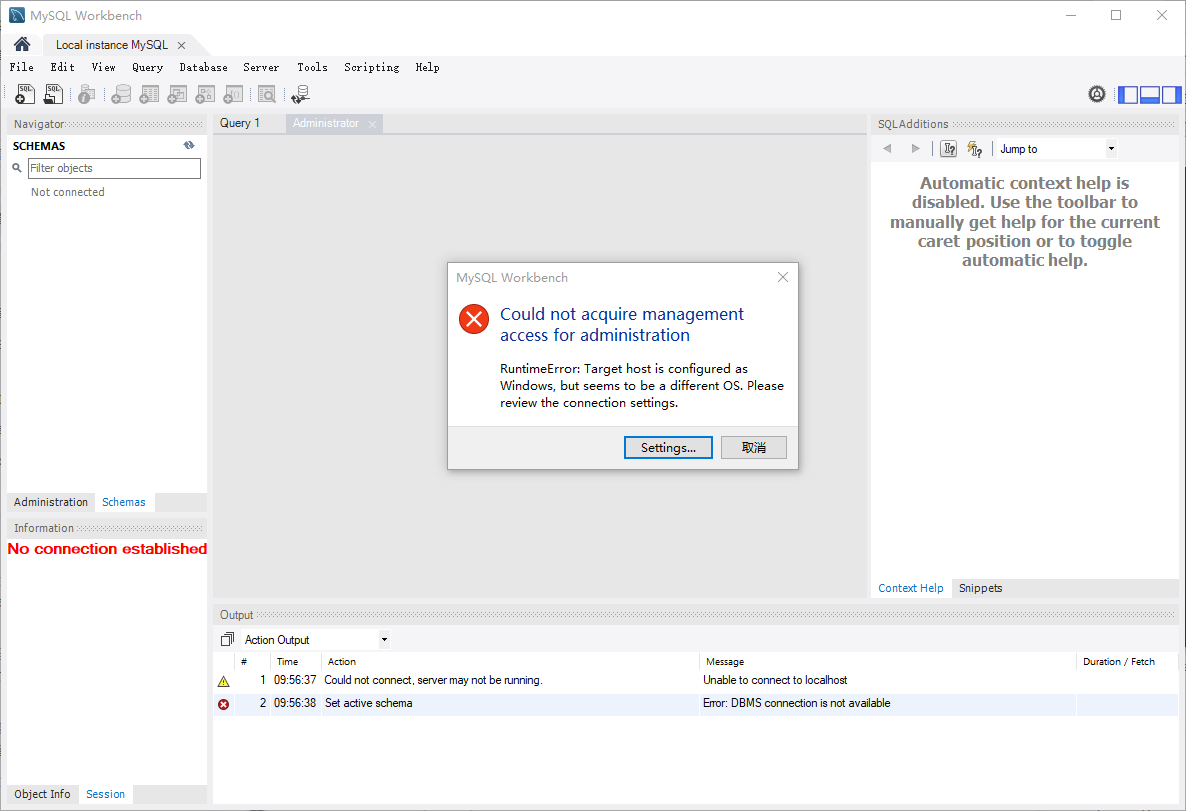
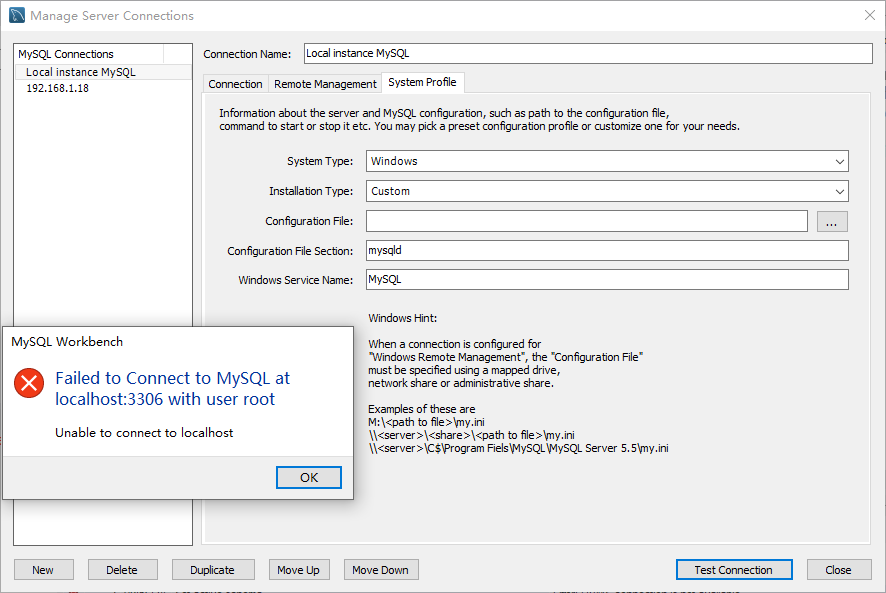
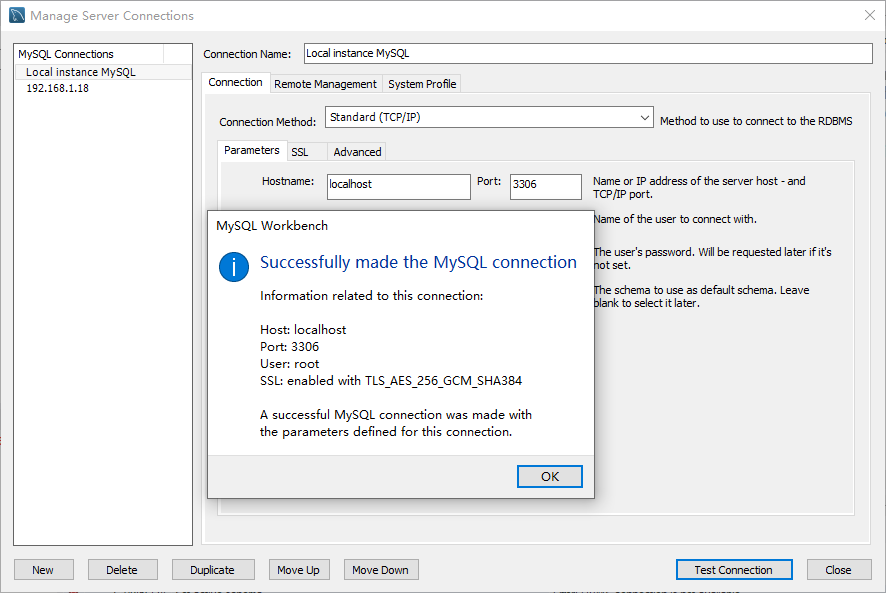
4. MySQL Workbench 连接不上mysql问题
加入host的范围
1 2 3 4 5 6 7 8 9 10 11 12 13 14 15 mysql> update user set host = '%' where user = 'root' ; mysql> select user ,host from mysql.user; + | user | host | + | root | % | | mysql.infoschema | localhost | | mysql.session | localhost | | mysql.sys | localhost | + 4 rows in set (0.00 sec)mysql> flush privileges; Query OK, 0 rows affected (0.01 sec)
终于成功。记得权限类的要flush privileges!
5. 设置expire_logs_days自动过期清理binlog 最近发现磁盘满了,saomiaoxia该分区发现mysql/data下大量binlog.000xxx文件,每个都几乎1G多,这是mysql二进制日志文件用于日志记录与操作恢复的,从没清理过,导致占用很大空间。
查看binlog过期时间,设置的时间为90天,这个值默认是0天,也就是说不自动清理,可以根据生产情况修改,本例修改为7天
1
2
3
4
5
6
7
8
9
10
11
12
13
14
15
16
17
18
19
20
21
22
23
24
mysql> show variables like 'expire_logs_days'; +------------------+-------+ | Variable_name | Value | +------------------+-------+ | expire_logs_days | 0 | +------------------+-------+ 1 row in set, 1 warning (0.00 sec) mysql> set global expire_logs_days=7; ERROR 3683 (HY000): The option expire_logs_days and binlog_expire_logs_seconds cannot be used together. Please use binlog_expire_logs_seconds to set the expire time (expire_logs_days is deprecated) mysql> set global binlog_expire_logs_seconds=60*60*24*7; Query OK, 0 rows affected (0.00 sec) mysql> show variables like '%expire%'; +--------------------------------+--------+ | Variable_name | Value | +--------------------------------+--------+ | binlog_expire_logs_seconds | 604800 | | disconnect_on_expired_password | ON | | expire_logs_days | 0 | +--------------------------------+--------+ 3 rows in set, 1 warning (0.00 sec) mysql>
设置之后不会立即清除,触发条件是:
binlog大小超过max_binlog_size
手动执行flush logs
重新启动时(MySQL将会new一个新文件用于记录binlog)
我们执行flush logs; 使之立即生效,过期日志文件就被删除了。
1
2
3
4
mysql> flush logs; Query OK, 0 rows affected (0.30 sec) mysql>
删除指定日期之前的 binlog :
1
2
mysql> PURGE MASTER LOGS BEFORE '2020-11-11 11:11:11'; Query OK, 0 rows affected (0.19 sec)
清空所有 binlog
1
2
mysql> RESET MASTER; Query OK, 0 rows affected (0.09 sec)
配置自动清理
1 mysql> set global expire_logs_days=7;
设置过期时长。过期自动删除,上面我刚试了,但提示:
The option expire_logs_days and binlog_expire_logs_seconds cannot be used together. Please use binlog_expire_logs_seconds to set the expire time (expire_logs_days is deprecated)
大意是 expire_logs_days 与 binlog_expire_logs_seconds 不能同时使用,让我们使用 binlog_expire_logs_seconds, 因为 expire_logs_days 已经过时了。 binlog_expire_logs_seconds 设置的过期时长单位是秒,设置7天过期:
1
2
3
4
5
6
7
8
9
10
11
12
13
14
mysql> set global binlog_expire_logs_seconds=60*60*24*7; Query OK, 0 rows affected (0.00 sec) mysql> show variables like '%expire%'; +--------------------------------+--------+ | Variable_name | Value | +--------------------------------+--------+ | binlog_expire_logs_seconds | 604800 | | disconnect_on_expired_password | ON | | expire_logs_days | 0 | +--------------------------------+--------+ 3 rows in set, 1 warning (0.00 sec) mysql>
附录